Happiness Project#83: The Fruitastic Breakfast Smoothie!


breakfastsmoothie2

breakfastsmoothie1

Let’s talk about smoothies. Or milkshakes. Or maybe both. Since starting chemotherapy 4 weeks ago, my taste buds have gone, well, a wee bit wacky. Many of the things that I used to love to indulge in, I simply don’t love anymore. Like coffee and chocolate. I know. Two things that simply don’t taste like coffee, or chocolate anymore. Truly saddening, right? *sigh* I can only hope that next year, one I’ve completed chemotherapy, I’ll finally be able to enjoy both of these Mom “staples” again.

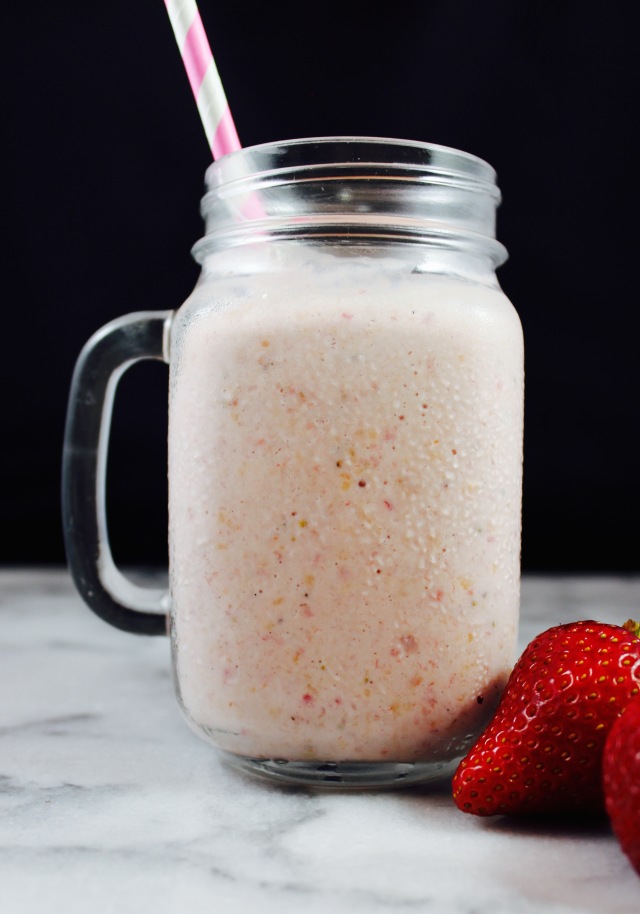
Until then, I’ve developed a list of things that I DO truly still enjoy right now. Mashed Potatoes, White Rice, Buttered Toast, Broccoli, Snap Peas, Peaches, Grapes and best yet, Strawberries! Can I get a hallelujah for strawberries?? Whew. Thanks Be. So to celebrate the list of things that I DO still enjoy indulging in, I’ve been on a smoothie/milkshake making frenzy! Because somehow, this Mama is determined to create the BEST fruity mix!

After a couple of trail & errors, I’m overjoyed to say that I’ve finally got it JUST right! And I truly know so, after my 3-1/2 year old came running up to me in the kitchen, hugging my leg while saying, “You make the best smoothies, Mommy!” Yeah, I nearly crumbled up into a giant puddle of love right then and there. Thanks Be for my greatest fan: my beautiful, sassy, enthusiastic Little Girl. She makes everything better.

Anyhow, back to this smoothie. Or milkshake, since true to any classic milkshake, this does incorporate milk.  You ready for one of the fruitiest breakfast drinks you’ll ever come across? Let’s do this! You’ll need:

2 cups fresh, rinsed and sliced strawberries

1 cup fresh, sliced peaches, either white or yellow, your choice

1/2 cup sliced banana

1-1/2 cup ice cubes

3 scoops vanilla ice cream

1/2 cup whole milk or orange juice

Throw all of those fresh ingredients into a blender, and pulse for 3-5 minutes until each of the ingredients is fully blended.

Spoon out this fruitastic smoothie into 4 of your favorite serving glasses. And serve while it’s cold!

Your tummies, and your mornings will thank you!

Until next time, xoxoxo

Happy National Ice Cream Day! Summer Ice Cream Round Up: 2015!

“You scream, I scream, we ALL scream for Ice Cream!”

It’s muggy and icky warm today, here in sunny California and ironically, the PERFECT setting to indulge in America’s favorite dessert: ice cream! And since I (unfortunately) won’t be back up and baking up anything new until early September, I’m determined to become the Mistress of Ice Cream. Which will (hopefully) result in epic brownie points from my Daughter and Husband. Which is the BEST reason of all for this massive Summer Round Up of Ice Cream loveliness!

So to kick off my first Round Up Series on the blog, I’m delighted to be sharing a few of the most delightfully, cool-tastic Ice Cream recipes! From blogger friends near and wide! Who know EXACTLY the right way to beat this summer heat!

Who’s ready for Ice Cream?

ice-cream-cake-3

First up in my Summer Ice Cream Round Up, is this GLORIOUS Frozen Banana Split Cake from one of my Mommy blogger friends at Dinner at the Zoo! Even though I’m not personally a huge fan of bananas, here’s what I LOVE about this cake, besides how pretty it is: not only does it incorporate 3 (yes, THREE ice cream flavors) within these 4 perfect layers of banana cake but it also has sprinkles! Sprinkles, my friends! I doubt there’s a soul alive who doesn’t like a good sprinkle garnish! So RUN, yes, RUN to the grocery store to stock up on these 3  ice cream flavors! This cake is all you need for show stopping, ice cream bliss! Thank you, Dinner at the Zoo, for this beautiful, summer masterpiece!

pinwheel-cookie-ice-cream-sandwiches-1

This 2nd featured recipe, Pinwheel Cookie Ice Cream Sandwiches, is by another of my Mommy blogger friends, at Mama Harris’ Kitchen! And oh my sweetness, this ice cream sandwich looks to die for! I love, LOVE ice cream sandwiches (though I’ve never attempted to create one of my own), and could quite possibly indulge in them every single day. Which unfortunately, would not agree with my Menopausal lifestyle right now. Not one bit. However, THIS tantalizing little sandwich has everything I like most about kitchen wizardry: homemade cookies with chocolate AND sprinkles, as well as the most creative ice cream flavor combination from Baskin-Robbins, that I’ve ever heard of. Potato Chips? Pretzels? Caramel? Yes, please! So really, what are you waiting for? There’s no way you can wrong with cookies and ice cream!

ZOURS-homemade-ice-cream-9

Who’s ready for ice cream and CANDY? Yes, I did just say candy! Mama Harris’ Kitchen ALSO has another sweet summer treat, Zours Candy Ice Cream! Incorporating one of my husband’s favorite movie theater indulgences, Mike and Ike’s Candies! Which he buys nearly EVERY time we’re able to spend some quality time at the local theater. And considering how quick and easy this recipe is to create, it’s very likely that this ice cream recipe will undoubtably become my husband’s best friend this summer. So much thanks, Mama Harris, for this perfect family treat!

ThinMintCookieCoffeeDFIceCreamleft

Now THIS Thin Mint Cookie and Coffee Dairy-Free Ice Cream from Urban Bliss Life, is ALL for me! Must I even explain why?? Coffee, my friends. Coffee. With cookies. The perfect companion to my semi-regualr book reading Sunday afternoons. Hot coffee is not always a good idea for warm summer days with a side of hot flashes. A favorite morning obsession of mine that is generally frowned upon in my family (out of love, though, rather than criticism). So this homemade coffee ice cream should be very happily received from now on. Sundays or not. Thank you, Urban Bliss Life, for this delicious ice cream recipe! You’ve officially saved my Sundays!

Breakfast Popsicles

Last up in my Summer Ice Cream Round up? These delectable looking Breakfast Popsicles from Working Mom Magic! Being a working mom myself (with two of my own weekend businesses), I truly appreciate fast, easy breakfast ideas for my 2-1/2 year old Daughter. And this Breakfast Popscicle, with all of it’s Honey Bunches of Oats cereal, fresh fruit, and yogurt GOODNESS, is right up my alley! Because what busy Mom (working or not) doesn’t want something healthy AND yummy for their ever blossoming kiddos? I, for one, cannot wait to try my hand at this kid-tastic recipe! Tonight, perhaps! From the kitchen of this Mama to yours, many thanks to Working Mom Magic, for this much needed post!

See anything from these featured recipe posts that you like? Which one will you be whipping up tonight?

Happy National Ice Cream Day, my friends! Hope you’re keeping it cool!

Happiness Project Recipe#58: Hawaiian Roll Tuna Cheese Sandwich!

grilledcs

Calling all sandwich fans! Did you know that April is National Grilled Cheese Sandwich Month?? I sure didn’t. It was only after I was browsing through one of my Mommy friend’s blogs that I was tuned into this delectable celebration. Thanks be for my ever widening blogging network! Filling up the Cadiz household, one cupboard and 3 tummies at a time!

So naturally, since so many other recipe masters are doing it, so must I! Ha! Herd mentality in this instance is perfectly acceptable, right? Because who on earth does NOT like a good grilled cheese sandwich?? No one I know, for sure.

Ready for one of the easiest & quickest little finger sandwiches you’ve possibly ever beheld? With my husband’s all-time favorite indulgence: the wonderful (but highly addictive) Hawaiian Bread Roll? You got it!

(2) 6oz cans of chunky white tuna, drained

1/2 cup mayonnaise

(1) pack of 8 Hawaiian Bread Rolls, sliced in half

3/4 cup shredded sharp cheddar cheese (Tilomock if you want the best)

Firstly, in a medium sized mixing bowl, add in the white tuna chunks and mayonnaise, stirring until fully combined.

Line up each sliced bread roll and spread on a nice sized dollop of the tuna mixture. Followed, by a large heaping of shredded cheese.

Close up each filled roll, and set up to 4 of them at a time, onto a long square piece of aluminum foil.

Set your toaster oven to the “Toast” setting and transfer the rolls to the oven, to crisp up for 2-3 minutes. The correct toast setting for these is all up to personal preference. I personally like these a well browned on the top and bottom of each roll.

And that’s it! Easy peasey! And the perfect size to nibble on in the afternoon. Especially with little toddler hands nearby. Or in my case, a hungry husband.

I’m eager to know what are your own favorite grilled cheese recipes? Share a link below, if you’re so inclined =)

Happy National Grilled Cheese Month, my friends!

Happiness Project#56: Lemon Berry Pancakes!

IMG_6083

Dear Breakfast, I heart you! With all of your fruits and granolas and yogurts. But your Lemon Pancakes? You slay me. Slay. Me.

If you know anything at all about my sweet tooth, then you must know of my endless, obsessive love for lemons. And strawberries. Chocolate, too, but that’s a far different story. So this new Lemon Pancake recipe is long, long overdue. Says nearly all of my family. Who happen to LOVE lemony desserts just as fanatically as I do. If not more so. Truth.

Anyhow, to make a long story short, because of my Daughter, and being a “up-at-7am-everyday-now” Mama, breakfast, with my mandatory cup of Mocha coffee, is now an everyday special kind of event. Which I (surprisingly) actually enjoy. I know. Go figure. And while my Toddler will snack on just about anything I make, my menopause diet demands otherwise. So pancakes, especially THESE pancakes, are an every-once-in-a-while treat for me. Though to be completely honest, I DO try to rationalize away any of those self-splurging doubts by helping myself to a ginormous topping of strawberries and blueberries. Because fruit IS healthy, after all. Right? Right.

And just so you know, once you treat yourself to these lemony fluffy yum-yums, you will never go back to a regular buttermilk pancake ever again. Trust me.

3/4 cup whole milk

1 teaspoon distilled white vinegar

3 drops of lemon juice

1 large egg

2 tablespoons unsalted butter, melted

1/2 teaspoon vanilla extract

1 cup all-purpose flour

2 tablespoons granulated sugar

1 teaspoon baking powder

1/2 teaspoon baking soda

pinch of kosher salt

1 tablespoon lemon zest, approximately 1 whole lemon

To begin, zest the whole lemon. Collect the lemon zest and set aside.

In bowl #1, combine the milk, vinegar and lemon juice. Let stand for 5 minutes before whisking in the egg, melted butter and vanilla extract. Set aside.

In bowl #2, whisk together the flour, sugar, baking powder, baking soda, salt and lemon zest. Slowly pour in the milk mixture (bowl #1) into the flour mixture (bowl #2) and stir until fully combined and lump free.

On your stove, heat up a medium sized frying pan over medium high heat, and lightly coat the pan with a baking spray or unsalted butter. Using a 1/4 sized measuring cup, pour the lemon pancake batter into the frying pan and let cook for 2-3 minutes on one side before flipping it over to cook itself on the other side. Between each pancake, remember to apply a light coat of butter to the frying pan before adding in each 1/4 cup of batter. Unless you actually like blackened pancakes *wink*

Yeah, these pancakes truly are THAT easy! And just WAIT until you taste them! With or without a large topping of syrup and fruit. Though, strawberries, my friends. Strawberries.

Happy Mornings to you and yours, my friends!

Happiness Project#52: Raspberry French Toast Rolls!

IMG_6044 3

It’s been a rough week. Or in all actuality, a rough month. From the day I was born 3 months premature, I fought for my lungs. My breath. My Life. And 36 years later, I’m still fighting. For my lungs. My breath. And my Life. In more ways than ever before. And although I am immensely blessed to be surrounded and uplifted by a very strong, loving group of Family & Friends, there are still days and nights where I feel very alone in this battle of mine. Because the truth? Unless you’ve been there, and walked in my shoes, particularly within the last 4 to 5 years, there’s only so much that anyone else can truly understand. And only so many ways that I can try to vocalize the things that I feel and think. Which leads to this week’s struggle with myself and my lungs. Resulting in 2 new inhalers, which leave me shaky, dizzy and horribly tired. As in “I can’t even see straight, more or less stand upright” shaky, dizzy and tired. So needless to say, it’s been one of THOSE weeks for me. One of which I cannot wait to be done & over with.

Anyhow, since you all know that baking is the one form of therapy that keeps me going, when I’m at my lowest, I desperately wanted to whip up something quick & pretty, with lots of taste. With fruit. Because holy geez, am I so READY to indulge in my favorite fruits this season! So. Ready.

Pinterest, apparently, is just as ready as I am, too. Umm, have you SEEN all of the newly pinned fruit recipes this year?? It’s bananas! Literally. Thanks to a newish Blueberry French Toast Roll Ups recipe from Damn Delicious, I was overjoyed to break out the frying pan and whip up my own breakfast dish. With raspberries and strawberries. And more cinnamon-y goodness than you’ve ever beheld. Ready for some fruity happiness in a pan? Here we go…

4 tablespoons salted butter

2 eggs, beaten

2 tablespoons whole milk

1/2 teaspoon vanilla extract

1/4 cup granulated sugar

2-1/2 teaspoons cinnamon

8 slices white bread, crusts removed

3 ounces cream cheese, softened slightly

1/2 cup raspberries, mashed up with a fork, OR 1/2 cup cored and finely diced fresh strawberries

Firstly, after removing the crusts, gently roll flat each bread slice, using either a rolling pin or the flat palms of your hands. Line up each flattened slice onto a flat plate and set aside.

Place the half cup of raspberries into a small bowl and flatten (or crush) each of them up with a fork, until the texture is pulpy and nearly smooth.

Using a small butter knife, spread out about a tablespoon & a half of cream cheese onto each bread slice. Try to spread on the cream cheese as evenly as possible. Now, on the bottom lip of each bread slice, spoon on up to 1 tablespoon of the crushed raspberries. With the tips of your fingers, firmly but gently roll up the bread slice, starting with the bottom lip (with the raspberries), all the way to the top. Once each slice is rolled up, set aside.

In another bowl, whisk together the eggs, milk and vanilla extract. Dredge each roll up in the egg batter, covering throughly.

Now to the frying pan! In a medium sized frying pan, on meduim-high heat, drop 2 tablespoons of butter into the pan, letting the butter coat the entire pan. Once the melted butter starts bubbling slightly, drop 2 to 3 french toast roll ups into the pan, turning the roll up over once or twice to create an evenly fried skin. If there’s not enough butter on the pan while you’re working through each set of 2 to 3 roll ups, add in another tablespoon of butter between each set.

While each roll up is still hot from the pan, transfer each piece to the bowl with the cinnamon & sugar mixture and generously coat. Because what’s french toast without a lovely helping of cinnamon-sugar?? Not French Toast, I believe.

Serve immediately. With MORE fruit. Because there’s no such thing as too much fruit for breakfast. Well, to me there isn’t.

*Recipe adapted from Damn Delicious

Happiness Project#51: Cinnamon Roll Crumb Cups!

IMG_6040

Guess what, my friends. Sometimes even I mess up a recipe. Sometimes quite tragically. Enter the Cinnamon Roll Muffins that I had foolishly attempted at 10pm last night, while I was what I like to refer to as being “stupid tired.” You know that tired which overcomes you at 8pm when you’re a Mother of a 23mo Toddler, after being pulled out of bed at 7 in the morning by little hands that want to go, go, GO? THAT tired. Where I tend to just kinda loose all sense of rhyme or reason. And willpower. Must not ever forget the general lack of willpower. You hear me, Mamas?

Anyhow, so last night. Cinnamon Roll Muffins. Fail. Not so much in the taste department but tragically & irreversibly in the prettiness department. To the point where I almost wanted to toss the whole batch. Until I actually tasted one of them, that is. Which, fortunately, saved this entire recipe. Because guess what? These sad, flat-toped muffins still tasted very, very good! Can I get a Hallelujah?! Hallelujah! Which got me thinking. About (my favorite) white coffee mugs. And spoons. And drizzle. Because let’s be real here, photography prettiness really does matter and can be JUST as important as the actual recipe itself. Truth.

Hence, this re-invented Cinnamon Crumb Cup recipe! Which became one of the best mistakes I’ve ever made thus far in my many kitchen adventures!

Cinnamon Roll Muffins (which will become crumbs very soon):

2-1/2 cups cake flour plus 2 reserved tablespoons

1 cup granulated sugar

pinch of kosher salt

1-1/2 tablespoons baking powder

1 cup butter, softened at room temperature

1 cup brown sugar

2 eggs

1/2 tablespoon vanilla extract

1 cup whole milk

2 tablespoons fresh ground cinnamon

For the Icing Drizzle:

1-1/2 cups powdered sugar

1/4 cup whole milk

Preheat the oven to 350D. Butter and lightly flour a 12 cup Jumbo Muffin Pan, tapping out the excess flour from the pan.

Firstly, in a small bowl, combine the fresh cinnamon and the 2 reserved tablespoons of flour. Mix and set aside.

In a 2nd (large) mixing bowl, combine the flour, sugar, salt and baking powder. Whisk to fully incorporate.

On a stand mixer, in another large bowl, beat the butter and brown sugar at medium speed, for a few minutes, until light and fluffy. Add in each egg, one at a time until fully incorporated, followed by the vanilla extract. Scrape down the sides and bottom of the bowl. Drop the mixer speed to a lower setting and gradually add in the flour mixture. Mix for 2 to 3 minutes. Lastly, add in the whole milk, a half cup at a time, until just incorporated.

Onward to the swirly part! Using a Tablespoon, drop 2 tablespoons of the muffin batter into each muffin round. Drop in a large pinch of cinnamon on top of the muffin batter. Followed by, again, dropping in another 2 tablespoons of muffin batter on top of the cinnamon layer. Now grab a butter knife and gently swirl the batter and the cinnamon layer together. This will create a messy marbled look. Key word: messy.

Pop the pan into the oven and bake for 21-23 minutes until a toothpick inserted in the muffins center come out clean.

The resulting muffin tops will look slightly flatter than a traditional dome shaped muffin (due to using cake flour instead of all purpose flour). Let cool in the pan for a few minutes before gently extracting each of them onto a wire rack.

Now here’s the part where I became a tad bit creative. Even though I could have just eaten up those flattened muffins as is, the photographer in me wanted something a bit more ascetically pleasing. Which meant crumbling up each muffin, with my fingertips, and then spooning those lovely crumbs into my favorite coffee mugs. Followed by drizzling each of those lovely cups of crumb with a super messy glaze.

Because drizzle, people! Drizzle! How can you not have a cinnamon roll without it’s glorious sugar topping?? You. Can’t.

And this powdered sugar glaze is ridiculously easy to create, too! So no excuses!

To create the glaze, combine the powdered sugar and the whole milk into a medium size mixing bowl, and whisk a couple of minutes until a shiny glaze forms. And then, drizzle!

Ha! So there you have it. Mix, bake, drizzle and serve. A mistake well worth anyone and everyone’s breakfast table!

Happiness Project #40: Cookie Batter Waffles!

IMG_5955

IMG_5960

Every month, for one glorious week, I travel 3 hours south, to where my sister & 3 nephews live. And even though I’ve been taking Ari with me, for a good 5 months now, it’s always a little bit like opening a huge, musical present on Christmas morning, filled to the brim with bubbles, legos, splashing, laughter and warm, giggly hugs! I am incredibly lucky enough to have one of those (somewhat rare) very close & loving relationships with both of my sisters, even though my oldest sister doesn’t live in the same area as the majority of my immediate family does. And now that I am finally FREE from so many of my previous health challenges (which prevented me from traveling), I am always incredibly excited about my special “Sister Adventure” trips! So is my (now) 17mo Daughter! Who ADORES her three VERY affectionate & loving cousins. ADORES them! Like no other! Cousin time that she doesn’t really have with any of my closest relatives (here in the Bay Area). Though, considering how much of an introvert I still am (in combination with my daily battle with PPD, anxiety and Menopause, yes, I did say Menopause at 36 years old), I’m fairly convinced that some of this “isolation” is partly my fault. Hence, our monthly trips south. With my oldest sister, I feel SAFE, which is a VERY important thing to me, especially since becoming a Mom.

Anyhow, every time my Daughter & I stay with my sister, I’ve been hell bent on either cooking a Dinner Dish or baking up a Dessert for her family, as a Thank You, for being such an important part of our lives, no matter how often my sister tells me that it’s not necessary *wink* So last week’s special treat, from me to my sister’s family, was Chocolate Chip Cookie Dough Waffles for Dinner! Yes, for Dinner! Because who doesn’t want breakfast for dinner?? And let me tell you, you haven’t lived until you’ve had Cookie Dough Waffles! Seriously! You may never look at a Waffle in the same way ever again, after this. I don’t. So here you go, my friends! Breakfast for Dinner =)

2-1/4 cups all-purpose flour

1 teaspoon baking soda

pinch of kosher salt

1 teaspoon fresh ground cinnamon

1 cup unsalted butter, melted

1 cup brown sugar, light or dark

1/2 cup granulated sugar

4 eggs

1/2 tablespoon vanilla

3 tablespoons whole milk

1 cup semi-sweet chocolate chips

Gather up all of your cookie dough ingredients, as well as your trusty waffle iron. My sadly neglected Cuisinart Waffle Maker has been sitting unused behind my coffee machine, for nearly a good year now. I’m quite convinced that if this pretty, little machine could talk, it would have been scolding me one minute yet joyfully singing out it’s freedom the next.

In a large mixing bowl, combine the flour, baking soda, salt and cinnamon, stir to mix. Set aside.

In a stand mixer (or by hand held mixer), beat together the melted butter, brown sugar and granulated sugar, for 2-3 minutes, until throughly combined. Beat in the eggs, one at a time, followed with the vanilla. Drop your mixer speed down to low and add in the flour mixture, until just blended. Stir in up to 3 tablespoons of milk to create a silky, liquid-like dough texture, instead of a traditionally thick cookie dough batter. A liquid-like batter is essential for creating a good waffle dough. Lastly, but most importantly (because, well, it’s chocolate), stir in those chocolate chips.

Once your waffle machine is prepped and ready, drop about a cup full of the cookie dough into each waffle segment and let bake for 4-5 minutes. If you’re not sure if your waffle maker is made with a non-stick iron, then lightly spray each segment with butter, before adding any cookie dough to it. Your waffles will be ready for consumption when the edges are lightly browned and the waffle is slightly springy to the touch. Oh, and when your entire house begins to smell just like a cookie! That’s the WHOLE idea, right? Right.

Best thing about these waffles? They taste just like the actual cookie so you don’t even need to add any topping to them. Unless you REALLY want butter, syrup and powdered sugar. They’re your waffles, after all! Though a scoop of Vanilla Ice-Cream might be fun, too. Just because.

Happiness Project #33: Strawberry Cream Cheese Muffins!

Image

Okay, I have a confession to make. Even though I LOVE (LOVE!) all things chocolate, you know what I love just as much? Strawberries. Plump, juicy, sweet strawberries. I can very easily settle down with a entire bowl of this fruit and eat them all. Every. Single. One. Without feeling a single twinge of shame. It’s a strawberry, for heavens sake! Natures all-natural, guilt free form of dessert indulgence! Right? Right! And please don’t delude yourself into thinking that you’re above consuming an entire bowl of these lovely, ripe beauties. Because we all know the honest truth. *wink wink*

Fortunately, even though it’s technically winter here in California (all of my California friends know why I’m laughing at the word “technically”), there are still a few hole-in-the-wall type markets who just so happen to carry (unusually ripe) baskets of this lovely fruit. Hallelujah, I say! A kitchen without strawberries is just as sad as a kitchen without chocolate or coffee. Terrifying thought, I know. So after quite joyfully picking up all of the supplies I needed for muffin making, you know what transpired shortly thereafter? Not only did my Baby Girl fall (very) sick (enough so that it was scary to me), but I, too, very quickly followed suit. To the point where even though I’m on 3 different prescriptions, I’m still mostly-in-bed a-sick after 6 days. No. Fun. My Baby Girl though is feeling much, much better and already frolicking around in her usual contagiously joyful manner. Which, to me, makes EVERYTHING better. Anyhow, to make a long story short, right up until today, those happy-go-lucky strawberries sat very quietly in my fridge, waiting to be freed. Hence, these pretty little muffins. With cream cheese spread. And my (rather) simple version of heart shaped strawberries. Want? Here you go…

For the Muffins:

3-1/4 cups all-purpose flour

1 tablespoon baking powder

1 cup salted butter, softened at room temperature

1-1/4 cups granulated sugar, plus 3-4 tablespoons for tossing

3 eggs

1 large egg white

1 cup whole milk

1-1/4 teaspoon pure vanilla extract

1-1/2 cups finely chopped strawberries

Firstly, finely chop or slice up the strawberries (after removing their green heads) and gently toss them in your reserved 3-4 tablespoons of granulated sugar. Otherwise, they will taste somewhat wet & slimy within the actual baked muffin. Set aside.

Preheat your oven to 350F. Fill up two cupcake pans with paper baking liners.

In a separate large bowl, whisk together the flour and baking powder until well mixed. Set aside.

In a bowl on your stand mixer, cream together the butter and 1-1/4 cups sugar until smooth and fluffy. Add all 3 eggs, plus the egg white, and vanilla extract and beat until well combined. After dropping your mixture speed to a lower setting, slowing add in the flour mixture to the butter mixture, alternating with the 1 cup of whole milk, always starting with and ending with the flour mixture. Once gently but fully combined, grab a spatula and mix in the chopped & sugar tossed strawberries.

Using a large spoon, scoop strawberry batter into each paper liner, filling to the top edges. Pop the two pans into the oven and bake for 22-25 minutes, until the muffin top edges are a very light golden brown. Let cool on a wire rack, while you’re preparing the cream cheese spread.

For the cream cheese spread, you’ll need:

1 cup unsalted butter, softened at room temperature

1 (8oz) package of cream cheese, softened at room temperature

2-3 cups powdered sugar

1-2 tablespoons whole milk (optional)

In a large, clean bowl on a stand mixture (or by hand held) cream together the butter and cream cheese until nicely blended and smooth. To avoid any clumping, scrap down the sides of the bowl with a spatula. Drop your mixer to a slower speed and add in the 2-3 cups powdered sugar, mixing until well combined. For a silkier texture, add in up to 2 tablespoons of whole milk.

Spread or frost your strawberries to your hearts contentment! Or if you’re not keen on cream cheese, you can also sift some powdered sugar onto each muffin instead!

Bam! Fruity Muffin Happiness! For everyone!

Happiness Project #32: Chocolate Orange Pound Cake!

Image

Mmmmmm! Orange and chocolate. Since nearly every HP dessert I’ve done since first creating this blog nearly 2 years ago has mostly involved chocolate, I thought it was high time to throw some citrus into the mix. And since I’ve never experimented with oranges before (for shame, right?), I ended up whipping up a very traditional Chocolate Orange Pound Cake recipe. Traditional because I did absolutely nothing to change the actual recipe, though I might add some chocolate chips into the mix the next around. And WOW, was this one of this easiest yet quickest cakes I’ve ever done! One, which not only smelled DIVINE while puffing up in my oven but tasted even better the second day out! Need to whip up something yummy that everyone will like but don’t have much time to do so? Then this, my friends, is the perfect cake for you!

1 cup salted butter, softened at room temperature

1 cup granulated sugar

4 eggs

1 cup all-purpose flour

2 tablespoons whole milk

3 tablespoons unsweetened cocoa powder

The zest from 1 large orange

1/2 cup semi-sweet chocolate chips, melted (for drizzle)

Preheat your oven to 350F. Butter and lightly flour 1 small loaf pan. Or butter up a muffin pan for yummy, breakfast treats instead! Have kids, anyone?

In a bowl on your stand mixer, cream together the butter and granulated sugar until smooth and creamy. Add in the eggs, one at a time, until well mixed, followed by slowly sifting in the all-purpose flour.

Once blended, divide the mixture equally between two small bowls. In one bowl, add in the milk & cocoa powder and combine together. In the second bowl, beat in the orange zest until well mixed.

Spoon the mixture into the loaf pan, taking large alternate spoonfuls from each bowl. Using a fork, gently swirl the mixture together to create a marbled effect. Do not STIR the two batters together though or they will blend and you will lose the marbled effect.

Bake for up to 45 minutes until golden brown on the edges and top. With a toothpick, check to make sure that the cake is fully baked through in the center.

Let cool on a wire rack for a good 30 minutes before loosening the cakes edges with the flat side of a butter knife and removing from the pan.

To add the chocolate drizzle, heat up the 1/2 cup of chocolate chips in the microwave (20-30 seconds) until melted and smooth. Drizzle as much as preferred onto the top half of the cake. Or instead of drizzling melted chocolate, how about sifting powdered sugar on top, particularly if you (or you kids) are hankering for some breakfast muffins? Your kids will love you even more (because what child doesn’t love powdered sugar?) and most assuredly, ask for seconds =)

*Original recipe: BBC Chocolate Orange Loaf

Happiness Project Recipe #17: Cinnamon French Toast Niblets!

Image

Oh breakfast! Bacon, eggs, hashed browns, pancakes, waffles and yes, we must not forget the most popular household staple: french toast! Since becoming pregnant 10 & a 1/2 weeks ago, this wiggling, waving little one has demanded so much from me, it’s actually quite astounding. Never before have I felt such a GROWLING need for comfort foods at such random hours of the day (and night)! Particularly in regards to breakfast foods! Up until now, breakfast was just NOT my thing. Give me dessert (any dessert!) & I was good. But since I’m now eating with another one’s appetite in mind, I will desist my snobbish disregard for breakfast foods & go with the cravings, AKA: Baby says, Momma does. Today’s craving? French Toast, which I’ve never had the pleasure of creating before. So French Toast bite-size niblets it is! Hungry? Here’s what you’ll need…

3 tablespoons granulated sugar

1 teaspoon ground cinnamon

2 large eggs

1/2 cup low fat buttermilk

1/2 cup whole milk

1 teaspoon vanilla extract

pinch of salt

1 loaf french or sourdough bread, cut into 1-inch cubes

2 tablespoons unsalted butter

Your favorite syrup

First, break out your cutting board & a large serrated knife to chop up your bread loaf of choice.

Next, in a medium size bowl, stir together the granulated sugar and cinnamon. Set aside.

In a 2nd bowl, whisk together the eggs, buttermilk, milk, vanilla and salt until nicely blended. Place the bread cubes in the egg mixture and using a large spoon, toss gently until the cubes are thoroughly coated and the egg mixture has been completely absorbed.

In a large non-stick frying pan over medium heat, melt one tablespoon of the butter. Drop half of the coated bread cubes into the pan and cook, turning often, until golden brown on each side, for about 8-10 minutes. When your 1st batch of bread cubes is nicely cooked up to your desired preference, move them to a dry bowl or plate on the side and repeat with the remaining bread cubes and 1 tablespoon of butter.  Once all of your cubes are cooked, sprinkle on the cinnamon sugar, using as little or as much as you like. Now, serve, with your favorite syrup and/or a little spoonful of powdered sugar and nibble, nibble away!

Happy breakfasting, my friends!