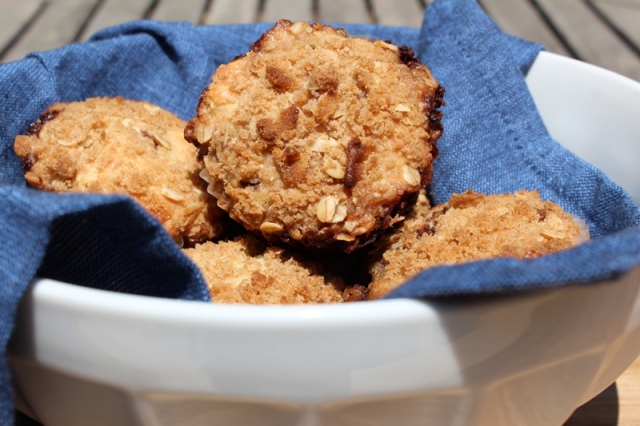
Happiness Project Recipe #16: Honey-Oatmeal Chocolate Chip Cookies!

Image

The funny thing about near constant nausea & ones inability to get any real sleep at night because of it, is how it makes you yearn for things you don’t usually have cravings for. Point in case, I’ve never been a big fan of oatmeal. Be it bars, cereal or cookies, oatmeal is just NOT my thing. I like my classic peanut butter. Or chunky chocolate chip. Case closed. Until now. Thanks to Martha Stewart, the cookie monster (within me) has awoken! And is hungry. Very, very hungry. Fortunately, for a few short hours, my roller coaster of a body decided to slow down enough for me to take a well earned breather. So, as usual, where was the first place I headed to? The kitchen. I wanted my cookies & I wanted them now! Got it? Good!

3 cups old-fashioned rolled oats

1 cup plus 2 tablespoons all-purpose flour

1/2 cup honey crunch wheat germ (I found a glass jar of this at Target)

1 teaspoon baking soda

1 teaspoon baking powder

1/2 teaspoon ground cinnamon

1/2 teaspoon coarse sea salt

1 cup unsalted butter, softened at room temperature

1 cup granulated sugar

1 cup packed brown sugar

2 large eggs

1 teaspoon pure vanilla extract

1 cup semi-sweet chocolate chips or 1 cup raisins (for oatmeal raisin cookies)

Preheat your oven to 350F. Stir together the oats, honey wheat germ, baking soda, baking powder, cinnamon and salt in a large bowl.

Mix your butter and sugars (granulated & brown) in a bowl on your electric mixer until pale & fluffy (about 4-5 minutes).  Mix in the eggs and vanilla until fully incorporated. After reducing your mixing speed to low, gradually add in the oat mixture until just combined. Stir in your chocolate chips or raisins by hand.

Using either a small ice cream scoop or gently rolling by hand, drop dough balls onto a parchment or Silpat lined baking sheet, placing them a good 2 inches apart (for expansion).

Bake for 12 to 13 minutes, until lightly golden & just set. Let cool on cookie sheets for 5 minutes before transferring them to a wire rack. You can store your cookies in an airtight container for up to 4 days (so eat them now!)

Moral of the story? If I can get my cookies this easily, then you can too! Happy baking, my friends!

* Recipe adapted from “Martha Stewart’s Cookies.”

Happiness Project Recipe #15: Celebration Sprinkle Cake Pancakes!

All I’ve been yammering about for the past 7 days is my near constant craving for cake batter pancakes so after my husband & I discovered something rather miraculous last night (Patience, my friends! You’ll have to wait & see!), I decided that even with all the cramping & nausea, I had to whip up a batch of this yummy, sprinkle pancake recipe. And let me tell you, these pancakes are very, VERY pretty little things! Who doesn’t like a little burst of rainbow happiness on a Saturday afternoon?! I do! Best of all, they’re super quick & relatively easy to create too! So no, you now have NO excuse not to whip up these tasty morning treats! None! *wink wink*

Pancakes:

1 1/2 cups all-purpose flour

2/3 cup yellow cake mix

1 tablespoon sugar

3/4 teaspoon baking powder

pinch of salt

2 large eggs

1 teaspoon clear vanilla extract

1 1/3 cups vanilla almond milk

handful of jumbo sized sprinkles

Glaze:

1 1/3 cups powdered sugar

1 tablespoon whole milk

1/2 teaspoon clear vanilla extract

First, whisk together the flour, cake mix, baking powder, sugar and salt together in a large bowl. Combine your milk, eggs and vanilla extract into another small bowl. Pour the wet mixture over the dry mixture and stir with a whisk or wooden spoon to combine. Next, fold in your jumbo sprinkles, as many as you would like.

With a preheated skillet over medium heat (lightly buttered up with a non-stick cooking spray), use a 1/3 cup measuring cup to portion out the batter into the pan. After 4-5 minutes, flip the pancake over and cook on the second side until nicely golden. Repeat with as much of the batter as you intend to use.

Once you’ve cooked up all of your pancakes, stir together the milk, vanilla extract and powdered sugar for your glaze until it’s consistency is smooth & glossy. Drizzle or drop in small spoonfuls over your rainbow pancakes! And then top with MORE sprinkles, if you’d like! There’s no such thing as too many sprinkles, I say!

See? Easy! So get yourself into that kitchen & get cooking! Life is all about celebrating the sweet & simple things! Especially when there’s sprinkles involved!

Happiness Project Recipe #14: Husband-Hero Cinnamon Oat Muffins!

It’s been an emotional week (to say the least) & whenever my body forces me into round-the-clock bed-rest, I tend to become either very depressed over it or very contemplative. Last night, as I lay exhausted in bed, listening to my beautiful red dog snoring softly from the floor & my husband’s slow, steady breathing beside me, I was nearly overwhelmed by how deeply grateful I am for the people who care for & love me so unconditionally, especially my husband. It’s not an easy thing to live in an environment frequently dominated by (my) pain, moodiness & depression. It takes immense strength & courage to walk with me down this turbulent path of strife & uncertainty. Yet through it all, he does, quietly & softly. Even within this trying time, there has never been a day where I have not believed in the love of my husband. In our 7 years together, he has taught me & continues to teach me that as long as we’re together nothing else matters. In the end, as long as we have each other, everything will be okay. Love will pull us through. So this muffin recipe is dedicated to my husband, who loves all things cinnamon. He is my knight in shining armor. My Imzadi. My hero. My world is a better place with him in it. Always.

Topping:

1/2 cup brown sugar

1/3 cup old fashioned oats

1/2 cup all-purpose flour

3 tablespoons butter, at room temperature

1/4 teaspoon ground cinnamon

Filling:

3 tablespoons butter, at room temperature

1/2 cup brown sugar

3 teaspoons ground cinnamon

5/6 teaspoons water

Muffins:

1/2 cup melted butter

3/4 cup whole milk

2 large eggs

1 3/4 cups all-purpose flour

1/2 cup old fashioned oats

2 tablespoons corn starch

3/4 cup granulated sugar

1 tablespoon baking powder

1 teaspoon kosher salt

1/4 teaspoon ground nutmeg

1/4 cup white chocolate chips (optional)

Glaze:

2 cups powdered sugar

2 tablespoons butter, at room temperature

4/5 tablespoons whole milk

Preheat your oven to 375F. Butter 12 muffins cups or line 12 cupcake tins.

First, mix all your Topping ingredients together with a fork until nice & crumbly. Set aside.

Now, mix all your Filling ingredients together with a spoon until the consistency is similar to that of frosting. Set aside until later.

For your muffins, in a large bowl (by hand) whisk together the butter, milk & eggs until well combined. In another bowl, stir together your flour, oats, cornstarch, sugar, baking powder, salt, nutmeg and white chocolate chips. Pour the dry ingredients into the wet one & stir until just combined.

Now, to get messy! Fill each muffin cup or cupcake tin with 2 tablespoons of batter. Then drop 2 teaspoons of filling on top, in the middle of the batter. With your remaining batter, drop another 2 tablespoons of batter on top of the filling. Lastly, sprinkle your crumbly topping evenly over each muffin.

Bake for 18-20 minutes for cupcake tins or 20-24 minutes for muffin cups. As your muffins are baking away, you’ll notice that the cinnamon filling will start to bubble up from around the edges of the batter & that’s okay. It’s supposed to do that.

For your Glaze, combine the butter, sugar and milk, stirring with a spoon until the glaze is smooth & shiny. If you think the glaze is too sugary (I personally like a sugary glaze), add another tablespoon of milk to thin it out.

Cool your muffins completely before drizzling on the glaze (I have not yet drizzled on my glaze, hence the naked muffin photo above).

Happiness Project Recipe #13: The BEST Chocolate Chip Muffin!

Gooey, gooey chocolate!

Lately, finding the best of all muffin recipes has become an all consuming obsession (besides my nuttiness with collecting beautiful cake stands) & since I’m such a sucker for the classics, I had to create the BEST Chocolate Chip Muffin! Had to! After consulting a vast variety of cookbooks, I finally found “the one.” With my own cinnamon twist, of course. So here’s what I created…

1/2 cup unsalted butter, melted

3/4 cup low fat buttermilk

2 large eggs

1 tablespoon vanilla extract

2 cups all-purpose flour

3/4 cup granulated sugar

2 teaspoons baking powder

1/2 teaspoon kosher salt

1 1/2 cups semi-sweet chocolate chips

1/2 teaspoon freshly ground cinnamon (optional)

Preheat your oven to 350F. Butter 12 muffin cups or line 12 cupcake tins with paper liners.

In a medium sized bowl (you can easily do this with a hand-held mixer), beat together the butter, buttermilk, egg & vanilla until just smooth (for about 1 minute.) If your batter is visibly very clumpy, it was over beaten & you will need to start over with a new batch.

In another bowl, stir together the flour, sugar, baking powder, baking soda, salt and optional cinnamon (if using). With your hands, make a shallow well in the center of the flour mixture, add in the buttermilk mixture, and beat until smooth and well mixed, 1-2 minutes. Using a large silicone spatula, gently fold in the chocolate chips until evenly distributed. Do not over mix, or the batter will fall flat (& won’t rise correctly when baking). The desired batter should be relatively thick (similar to that of cookie dough) & very sticky. Spoon the batter into each muffin cup or cupcake tin, filling it nearly level with the rim.

Bake your muffins for 20-24 minutes for standard size muffins or 18-20 minutes for standard size cupcakes. They should be lightly golden & springy to the touch when removed. Let cool for 5-10 minutes before serving.

After bringing home the left-overs last night from a friends 4th of July party, I discovered a catch. I didn’t & still don’t  want to share any of them. That’s how much I adore this recipe. You will too!

*Recipe adapted from “The Williams-Sonoma Baking Book”

Happiness Project Recipe #12: Chocolate PB Pretzel Niblets!

Image

Oh Chocolate! Glorious, glorious chocolate! In addition to random, early morning cravings for oyster crackers & sour patch kids, the thought of chocolate alone sometimes gets me through the worst of pain. Unless, of course that thought becomes a horrible, uncontrollable longing at 1am that MUST be fed (imagine dragging yourself out of bed in the middle of the night to spend some quality time with your kitchen)! So in the interest of self preservation, I made that terrible longing for chocolaty, crunchy sweetness a long awaited reality! Hence the birth of my FAVORITE Happiness Project recipe thus far: the Chocolate PB Pretzel Niblet! Yes, this unassuming bite-size morsel has now become one of my all time FAVORITE dessert recipes (and that’s saying something considering the uncountable number of recipes I’ve been tinkering with these past few months)! I quite literally inhaled THREE of them, back to back yesterday, without batting an eye! That’s madness, my friends! Madness! So with no further adieu, here’s the recipe…

1 1/8 cups creamy peanut butter

10 tablespoons confections sugar

2 tablespoons unsalted butter, room temperature

2 cups finely crushed Pretzels

10 ounces milk or dark chocolate candy melts

Break out that apron again! You’re going to need it for this one!

In a medium sized mixing bowl (with a paddle attachment if on a stand mixer), stir together the peanut butter, confections sugar, butter & crushed pretzels until well combined. You can easily do this by hand with a wooden spoon if you don’t have a stand mixer.

Quick tip: Place your pretzels in a closed ziplock bag while crushing them up. Clean up is easier this way. Plus, your kitchen will thank you.

Roll or firmly pinch your mixture into 1 inch balls & arrange them on a parchment or Silpat lined baking sheet. This should make you about 24 pretzel balls. Freeze them for 30-40 minutes until firm.

Before you take your semi-frozen pretzel balls out of the freezer, melt your chocolate candy in a microwave safe bowl on high for about 1 minute, stirring at each 30 second interval. Using a large fork or spoon, dip each ball into your bowl of melted chocolate, gently tapping the fork or spoon on the bowls rim to remove excess chocolate. Deposit your covered balls onto your lined baking sheet & chill in the fridge until the candy coating is set before serving. If not serving immediately, keep them in an airtight container for up to 3 days.

Easy, right? Right!

Happy 4th of July, my friends! And happy nibbling!

Happiness Project Recipe #11: Saturday Morning Lemon-Poppy Seed Muffins!

Image

Considering how up & down I’ve been with the pain this week, I was damn near frothing at the mouth this morning for something super moist & fluffy. Something that didn’t involve any chocolate for once. I know, I know, who AM I, right?? *wink* So this super moist & fluffy “something” ended up incorporating my 2nd all time favorite dessert flavor: lemon. Luscious, luscious lemon! Whenever I think of weekends, the idea of muffins always seem to come to mind, so with this being said, I decided to tinker with a recipe I’ve never done before: Lemon-Poppy Seed! Though I will forever be a cupcake girl, the muffin is the 2nd closest thing to it, so why (oh, why) have I never made any before?! Fortunately, my Williams-Sonoma Baking Book saved the day (or morning, to be precise). A little bit of soft butter spread also created that extra burst of flavor to a rather good Saturday baking adventure as well. For all of my lemon loving friends (I know who you are!), here’s the recipe..

½ cup unsalted butter, at room temperature

2/3 cup granulated sugar

2 large eggs, separated (into egg yolks & egg whites)

1 1/3 cups all purpose flour

1 teaspoon baking powder

½ teaspoon baking soda

2 tablespoons poppy seeds

Zest of 2 grated lemons

¼ teaspoon kosher salt

½ cup low fat buttermilk

2 ½ tablespoons lemon juice

1 tablespoon vanilla extract

Preheat your oven to 350F. Butter 10 standard size muffin cups or line 12 cupcake tins with paper liners.

Gather up your ingredients & necessary baking equipment. You’ll need 3 separate medium size mixing bowls for this recipe.

In your 1st mixing bowl, on a stand mixer, cream together the butter and sugar on medium speed until light and fluffy. While this is creaming together, separate your 2 eggs. I use two small bowls to keep the egg yolks separate from the egg whites. Add the yellow egg yolks, one at a time, beating well after each addition until well blended.

In your 2nd mixing bowl, stir together the flour, baking powder, baking soda, grated lemon zest & salt. Quick tip: After you gather your ingredients, zest your 2 lemons with a stainless steel grating zester (which you can find at any local Bed, Bath & Beyond, Williams Sonoma or Sur La Table store) BEFORE you begin the process of mixing together your ingredients. Preparation is key to creating a quicker, easier & cleaner (yes, cleaner!) baking experience. Now, using the mixer on low speed, add the flour mixture to the butter mixture (bowl #1) in 2 additions, alternating with the buttermilk, then the lemon juice and then the vanilla. Beat until just smooth (for approximately 1-2 minutes).

For the next step, if you don’t have 2 separate stand mixers (I certainly don’t but wish I did), pour the entire mixture into another medium sized bowl & set aside. At this point, you’ll need to thoroughly wash & dry the bowl that you’ve just emptied (bowl #1).

Once clean & completely dry, use this bowl again in your stand mixture, using a balloon whisk to beat your egg whites just until they form a soft white peak (beat on high for 2-3 minutes.) Do NOT over beat your egg whites! Keep in mind that they need to be a soft peak consistency not a stiff one so keep a close eye on them while in the process of whisking. Using a large silicone spatula, gently (no elbow grease required!) fold the egg whites into the batter until just blended.

Spoon your batter into each muffin cup or cupcake tin, filling them three-fourths full. Bake until golden brown and springy to the touch (20-24 minutes for standard size muffins, 18-20 minutes for standard size cupcakes.)

Cool on a wire rack for 5 to10 minutes before serving. And don’t forget to add some of your favorite butter spread to them as well! A properly dressed muffin is always the perfect muffin, I say!

There you have it! Quick & easy! So if you too have a napping husband & therefore a little extra time on your hands, prepare yourself (and your kitchen) for the sudden appearance (and resulting disappearance) of these soft, tangy, lemon filled creations! Huzzah for Saturdays!

*Recipe adapted from “The Williams-Sonoma Baking Book”