Happiness Project#75: Funfetti Cookie Cheesecake!

sprinklecc1

sprinklecc2

Holy Sweetness! This cheesecake. This funfetti cookie cheesecake is quite possibly one of the yummiest things that I have ever wrapped my taste buds around. After toying with it’s balance through a couple of failed baking sessions. But at last, THIS. Which I am quite proud of, I must admit. Because unless you’ve been hiding under a rock all of our life, you can’t not like cookies, cake AND sprinkles. The best of everything dessert. In my humble opinion, at least.

This cheesecake has basically saved me. From my very turbulent heart. The past two weeks has been some of the most impossible weeks I’ve ever faced. In comparison to my very difficult stay in the mental ward, when I had been suicidal shortly after the birth of my daughter, 3 years ago. That’s how rough the past couple of weeks have been. From unexplainably losing a mommy friend of mine (one of my closest this past year & a half), to the tragic passing of one of my Crown Books comrades, to discovering that I have, yet again, another tumor rapidly creating mass chaos within my body, I was at the edge of my tolerance. For, well, everything. Including life in general.

However, thanks in part to a new support group of women that I’ve been interacting with, as well as the calming presence of my doctor, I’m feeling more optimistic and hopeful about where I am right now in life, than I have in years. YEARS. Which, in my life, is a cause for much celebration! Starting with THIS cheesecake. Something you do not want to miss out on. Trust me. Ready? You’ll need:

For the cookie crust:

24 pre-baked sugar cookies (which you can create from scratch or with pre-made freezer dough)

4 tablespoons of unsalted butter, melted

1/2 cup rainbow sprinkles

To prepare your cookie crust, first, finely crush up those 24 pre-baked sugar cookies in a food processor. Your cookie crumbs will want to resemble a texture akin to grainy sand.

Dump the crumbs into a small bowl. Add in the 1/2 cup of sprinkles, as well as the melted butter. With your hands, mix all three ingredients together until the full mixture is slightly moist.

Now to the 9 inch springfoam baking pan. Lightly grease the bottom of the pan, so that the cookie crust does not stick to the surface upon extraction. Preheat the oven to 325d. While the oven is warming up, take heavy ply aluminum foil and tightly wrap up the entire bottom and outside surface of the pan. This is to prevent water from seeping into the cheesecake layer while being baked. Once wrapped, take your funfetti cookie dough and firmly press into the bottom of the cheesecake pan. Bake this bottom layer in the oven for 8 minutes.

While your cookie layer is baking away, you can work on preparing the cheesecake layer. Here’s what you’ll need:

24 ounces of cream cheese, warmed to room temperature

1 cup of granulated sugar

4 eggs

1 tablespoon of vanilla extract

3/4 cup whole milk

On a stand or with a hand held mixer, beat the cream cheese together with the sugar, until smooth. Add in the eggs, one at a time, scraping down the sides of the mixing bowl between each addition. Add in the vanilla extract, slowly followed by the whole milk. Mix well until your cheesecake batter is lump free.

By now, you”ll be able to take out the cookie layer from the oven. Let rest for a few minutes, at room temperature, before spooning in the cheesecake batter on top.

For this recipe, I used a water bath to control the overall temperature of the cheesecake while it was baking. For a water bath, take a tall lipped pan, or a turkey roasting dish (that is wider that the spring foam pan) and, after placing the cheesecake pan within it, slowly pour boiling water into the bathing pan, until the water reaches halfway up the sides of the cheesecake pan.

Let bake for 50 minutes, until the edges of the cheesecake is slightly firm to the touch, and the center of the cheesecake is slightly gooey.

Turn off the oven and let the cheesecake rest inside the oven, with the oven door cracked open, for 45 minutes to an hour.

Upon removing the cheesecake from the oven, smoothly remove from the water bath, and unwrap the cheesecake pan from the aluminum foil. Again, let stand, at room temperature for a good half hour.

Now comes the waiting. Cover the top of the cooled cheesecake with plastic wrap and let chill in the fridge for at least 7 hours.

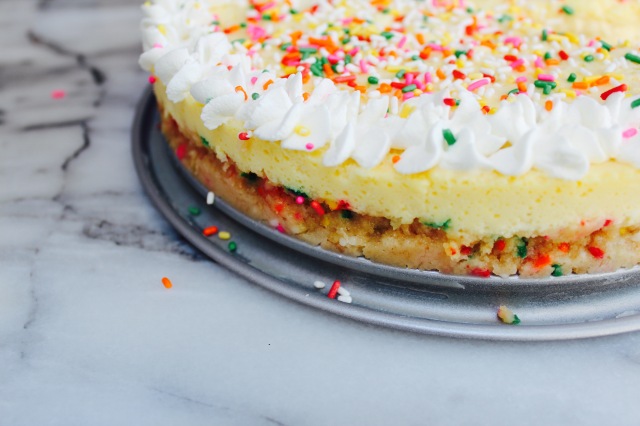
Once you’re ready to serve (after that long 7 hour wait), remove the pan from the fridge, and gently pop open the pan. Now here’s the super important tip: when releasing the cheesecake from the pan, do not shake the cheesecake out of the pan. That was my mistake with my 1st failed recipe. Let the cheesecake pull away from the pan itself. Even if that means waiting a few minutes for it to do so on it’s own. Therefore, your lovely cookie cheesecake will come out nice and clean.

AND now sprinkle! With as many sprinkles as your happy heart desires! Must I say, the more the merrier? OR scoop on some cold vanilla ice cream. Because cookies, cake, sprinkles AND ice cream? Kinda brilliant!

Until next time, all my love! xoxoxo


Happiness Project Recipe #27: Mini Chocolate Chip Cookie Cheesecake Cups!

Image

With only 3 weeks to go before I hit 40 weeks in my pregnancy, I have this unexplainable feeling that next week might be THE week! Within this past week, I’ve been a bundle of nervous, anxious, excited energy & this unexpected onslaught of emotions has left me feeling a bit off balance. All of a sudden, something akin to fear hits me. All predominately based on very normal parenting uncertainties. Will I be a good Mother? Do I have what it takes to be everything that my little girl truly needs? Fortunately, I’m sensible enough to know that most first time, new moms feel like this, to various degrees. That’s simply how life is when embarking on a mementos new adventure. The most important adventure a person can possible begin: that of becoming a parent. So in lieu of all of my jumpy emotions, I wanted to squeeze in one more recipe before what I suspect might be THE big week. And since one of my very first pregnancy cravings was for a classic vanilla bean cheesecake, I decided to end (temporarily) on a similar note. With cheesecake, in my favorite dessert form: a cupcake. Although I had originally planned on using mini chocolate chips within the recipe, I ended up settling for standard sized chocolate chips instead, after discovering a sadly diminished lack of mini chocolate chips in my baking cabinet (tis a sad day, indeed). Overall, using a standard sized chocolate chip certainly did not take anything away from the desired taste. If anything it packed an even heftier punch of chocolate, which isn’t actually a bad thing, right? So here it is…

Crust:

1 cup graham cracker crumbs

2 tablespoons brown sugar

pinch of kosher salt

3 tablespoons salted butter, melted

Cheesecake:

8 ounce package of cream cheese, softened at room temperature

2 tablespoons sour cream

1/3 cup granulated sugar

1 egg

1 teaspoon vanilla extract

1/2 cup mini chocolate chips

Preheat your oven to 350F. Line 12 cupcake tins with paper baking liners.

In bowl #1, mix together the graham cracker crumbs with the brown sugar and salt until well combined. Pour in the melted butter and mix with your fingers until evenly coated and crumbly.

In a 2nd large bowl, on a stand mixer, cream together the cream cheese, sour cream and sugar until smooth, scraping down the sides of the bowl to prevent any lumps in the batter from forming. Beat in the egg and vanilla extract until well combined. Set aside.

In your cupcake pan, scoop up about 1-1/2 tablespoons of the graham cracker crust into each paper liner, pressing the crumbs down into a nice, even layer. Now, evenly divide the cheesecake batter between the cupcake liners, pouring the batter over the graham cracker bottom, filling each liner nearly to the brim. Sprinkle however many mini chocolate chips over the top of the cheesecake batter as you desire.

Bake for 18-21 minutes until the tops are nearly completely firm to the touch. Remove the cupcake pan from the oven and cool on a wire rack for about an hour before popping them into the refrigerator for another 2 hours to let them set up correctly. When not serving immediately, store in a airtight container in your refrigerator for up to 3 days.

Happiness Project Recipe #23: Cookies & Cream Cheesecake!

Image

Oh cheesecake! Oreo. Cheesecake. The best of both worlds combined into one tasty, decadent bite! During my 1st trimester, one of my daily cravings was the single serving vanilla cheesecake from Jack In The Box. A craving which I couldn’t help but indulge in far more often than what was technically considered healthy. So even now at 31 weeks, it’s no surprise that I’ve once again become a wee bit obsessed with this one particular dessert. Hence this new, very fun recipe. With Oreos. Did I mention Oreos? *wink* The ONLY downside to this yummy, drizzled concoction? These little niblets are almost too decadent for single mass consumption. Trust me. I know. Don’t believe me? Try these. I dare you.

36 Oreo Cookies (24 for crust bottom, 12 for cheesecake batter)

1/4 cup salted butter, melted

4 (8) ounce packages of cream cheese, softened at room temperature

1 cup granulated sugar

1 cup sour cream

1 teaspoon vanilla

4 eggs

1/2 cup milk chocolate chips (for drizzle garnish)

Preheat your oven to 325F. Line a 9×13 inch baking pan with aluminum foil,  leaving enough side foil to hang over the edges of the pan.

Finely crush up 24 Oreos for the crumb bottom. Melt the butter in a microwave safe bowl and then mix well with the crushed Oreos. Press the mixture onto the bottom of the pan. Yes, this will be quite sticky so have patience while gently and firmly pressing out the entire mixture, making sure to create nicely formed edges at each corner.

For the cheesecake batter, using a large bowl on a stand mixer, beat the cream cheese and sugar until fully incorporated. Blend in the sour cream and vanilla. Add the eggs, one at a time, scraping down the sides of the bowl with a spatula after each addition. Roughly crush or chop up the remaining 12 Oreo cookies and gently fold them into the batter. Now pour the batter over the cookie crust.

Bake the cheesecake for 35-40 minutes, until the edges are firmly set and the center is nearly fully set. Cool on a wire rack for at least 1 hour before covering with plastic wrap and chilling in the fridge for 2-1/2 to 3 hours. Once the cheesecake is sufficiently chilled, take the cheesecake from the fridge and remove from the pan, using the foil overhang. Using a small pairing knife, cut up the cheesecake into whatever desired sized pieces you want. Set the cut pieces onto a parchment or Silpat lined baking sheet: you might get a wee bit messy with the chocolate drizzle.

For the drizzle, heat up the chocolate chips in a microwave safe bowl until fully melted. Using either a pastry bag with a small, round decorating tip or a Ziploc bag (sniped at the bottom corner), pour the chocolate into the bag and drizzle as much or as little onto the cheesecake pieces as your hungry heart desires.

If not serving immediately, cover with plastic wrap and chill in the fridge until ready for consumption. Mass consumption. Party-worthy consumption.

Your friends and family will worship you forever for this!