Happiness Project#56: Lemon Berry Pancakes!

IMG_6083

Dear Breakfast, I heart you! With all of your fruits and granolas and yogurts. But your Lemon Pancakes? You slay me. Slay. Me.

If you know anything at all about my sweet tooth, then you must know of my endless, obsessive love for lemons. And strawberries. Chocolate, too, but that’s a far different story. So this new Lemon Pancake recipe is long, long overdue. Says nearly all of my family. Who happen to LOVE lemony desserts just as fanatically as I do. If not more so. Truth.

Anyhow, to make a long story short, because of my Daughter, and being a “up-at-7am-everyday-now” Mama, breakfast, with my mandatory cup of Mocha coffee, is now an everyday special kind of event. Which I (surprisingly) actually enjoy. I know. Go figure. And while my Toddler will snack on just about anything I make, my menopause diet demands otherwise. So pancakes, especially THESE pancakes, are an every-once-in-a-while treat for me. Though to be completely honest, I DO try to rationalize away any of those self-splurging doubts by helping myself to a ginormous topping of strawberries and blueberries. Because fruit IS healthy, after all. Right? Right.

And just so you know, once you treat yourself to these lemony fluffy yum-yums, you will never go back to a regular buttermilk pancake ever again. Trust me.

3/4 cup whole milk

1 teaspoon distilled white vinegar

3 drops of lemon juice

1 large egg

2 tablespoons unsalted butter, melted

1/2 teaspoon vanilla extract

1 cup all-purpose flour

2 tablespoons granulated sugar

1 teaspoon baking powder

1/2 teaspoon baking soda

pinch of kosher salt

1 tablespoon lemon zest, approximately 1 whole lemon

To begin, zest the whole lemon. Collect the lemon zest and set aside.

In bowl #1, combine the milk, vinegar and lemon juice. Let stand for 5 minutes before whisking in the egg, melted butter and vanilla extract. Set aside.

In bowl #2, whisk together the flour, sugar, baking powder, baking soda, salt and lemon zest. Slowly pour in the milk mixture (bowl #1) into the flour mixture (bowl #2) and stir until fully combined and lump free.

On your stove, heat up a medium sized frying pan over medium high heat, and lightly coat the pan with a baking spray or unsalted butter. Using a 1/4 sized measuring cup, pour the lemon pancake batter into the frying pan and let cook for 2-3 minutes on one side before flipping it over to cook itself on the other side. Between each pancake, remember to apply a light coat of butter to the frying pan before adding in each 1/4 cup of batter. Unless you actually like blackened pancakes *wink*

Yeah, these pancakes truly are THAT easy! And just WAIT until you taste them! With or without a large topping of syrup and fruit. Though, strawberries, my friends. Strawberries.

Happy Mornings to you and yours, my friends!

Happiness Project:#55: Happy Heart Cookies!

heartccc

Love. Friendship. Happiness. Joy. Pain. Sadness. Life. For those of you who have been following my blog, from the very first recipe post, a little over 2 years ago, you’ve seen my Heart here. My Joys. My Life. My Struggle. For everything worth meaning. And you know of the importance I place upon being able to express all of these feelings & experiences. Because I believe in the power of sharing one’s Life and one’s Heart to those who will listen. No matter how shadowed or darkened that I may be. And it’s because of you, you who support and love me through it all, that I’ve journeyed to where I am today. It’s because of YOU that I am still here. In more ways than one. And it’s because of you that I know, truly know, of the immeasurable blessings within this beautiful little life of mine.

So for you, I am thankful. From every little piece of my heart. Thank you for letting me be, me. This Happy Heart Cookie recipe is for YOU ❤

2-1/2 cups all-purpose flour

1 teaspoon baking soda

1/2 teaspoon fresh ground cinnamon

pinch of kosher salt

1 cup unsalted butter, softened at room temperature

1 cup light brown sugar

1/2 cup granulated sugar

2 large eggs

1 teaspoon vanilla extract

1 cup mini semi-sweet chocolate chips

Preheat your oven to 350F. Spray a 9×10 inch glass baking dish. Then layer with parchment paper. Lightly coat (again) with (a butter & flour) spray. Set aside.

In a large mixing bowl, combine the flour, baking soda, salt and cinnamon, and stir for a few minutes until nicely combined.

In another large bowl, on a stand mixer (or by hand held), beat the butter, brown sugar and granulated sugar on high until fully blended and creamy.

Beat in the eggs, one at a time, until fully incorporated. Blend in the vanilla extract and continue mixing for 3 to 4 minutes.

Stir in the flour mixture, in two batches, until just combined.Then throw in those chocolate chips and stir em up!

Spoon out the cookie dough into the prepared dish and evenly spread out the entire dough with either a rubber spatula or the flat of your hands.

*I prefer to use my hands with most of my cookie recipes so that I can feel the dough between my fingers. There’s something uniquely therapeutic (and magical even) about working with cookie dough within ones hands, instead of with a spatula or rolling pin. And wonderfully, beautifully messy.

Once you’ve spread out and flatted the cookie dough in the baking dish, pop it into the oven and let bake for 20-25 minutes, depending upon how firm or slightly gooey you like a chocolate chip cookie’s center. Though when it comes to cookies, any cookies, there’s never really any right or wrong way to create the perfect cookie. Right? Right!

Let cool on a wire rack for about 10-15 minutes before getting creative with your heart (or any other) shaped cookie cutters. When using your cookie cutters with this baked cookie, gently press the cutter into the giant cookie so that it doesn’t crumble or break. Gently extract each cut heart piece and serve! Or store in a favorite family cookie jar or fun container for up to 4 days.

To all of my Family, Friends and Followers, thank you for everything! ❤ ❤ ❤

Happiness Project: #54: Birthday Candy Popcorn!

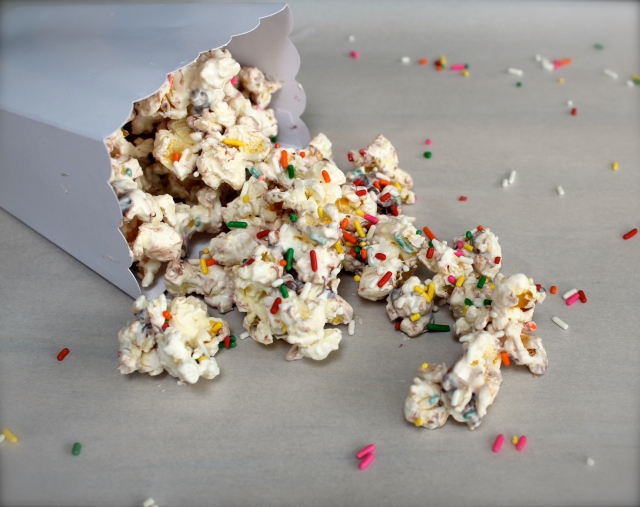
candypop

Birthdays! HUZZAH for Birthdays! Up until I became a Mother of my beautiful 2 year old Daughter, I was always very C’est la vie about celebrating another birthday. But thanks to the love that I have with my Baby Girl, my heart has changed, in every way that matters most. Especially, when it comes to birthdays. Because, yes, mommyhood truly DOES change all.

So for my one & only Daughter’s 2nd birthday earlier this month, besides creating a Vanilla Strawberry Cake with a side of Funfetti Minnie Mouse Cupcakes, I also threw together some Candy Popcorn for all of the kiddos at her Minnie Mouse themed party. With Sprinkles. And Chocolate Chips. And maybe a little bit of white chocolate candy melts. Because movie time is always made better with popcorn AND candy, right? Right! And the best thing about this super FUN popcorn recipe? It’s quite possibly the SIMPLEST recipe that a busy parent can hope for. Which is beyond (beyond) wonderful! Believe me. I know. Oh, and did I almost forget to mention, it’s very versatile, as well? It is! Ready for some Pop-tastic (ha!) Party Food?? Look no further!

2 bags of sea salt popcorn (non-buttered!)

1 (8oz) bag of white chocolate or vanilla flavored candy melts

1 cup mini semi-sweet chocolate chips

1 cup rainbow jimmies or sprinkles

*OR add in whatever small candies that you or your kiddo(s) prefer! M&M’s? Hershey’s Kisses? Butterfinger Bars (crushed up)?You name it! Hence the versatility!*

Pop the 2 bags of popcorn according to the bagged instructions. Place the popped popcorn into a large bowl and set aside.

Heat up the candy melts in a microwave safe bowl, in two to three 20 seconds intervals, strirring in between each 20 second interval, until smooth and fully melted.

Slowly pour the melted chocolate into the bowl of popcorn. Then layer with both cups of the chocolate chips and sprinkles.

While the melted chocolate is still warm, with a rubber spatula, gently stir the chocolate and candies into the popcorn, making sure to toss the popcorn at the bottom of the bowl until fully coated.

AND serve! In all of it’s gooey, messy, joyful yumminess!

So. SO. Easy.

And perfect for every little pair of hands within your family. Or any adult child at heart ❤

“Do not regret growing old. It is a privilege denied to many.”

Happiness Project: #53: My Baby Girl’s Favorite Strawberry Frosting!

strwbrfrst

It’s official! My sassy, determined, brave, loving, beautiful Baby Girl is now TWO years old! TWO! Hence I have tears of pure joy streaming down my cheeks, as I attempt to write my heart out. Which is not always an easy thing to do, when your heart feels like it’s exploding within your chest and tears are blinding your very sight. But write I shall! Because writing, to me, is truly THAT important. For therapy, sanity and love. Most especially, for love.

Love that began with my Husband, nearly 10 years ago, and was multiplied with the Miracle of my Baby Girl. This Miracle that I reflect on and am immensely grateful for, every morning that I rise, with her smile shining down upon me, and every evening when I close my eyes, with those soft brown Toddler curls dusting my pillow. But how, how do you truly explain this type of forever Love? A love so empowering and so depthless that it becomes the very air that you breathe and beat of ones heart? In all actuality, you can’t. This kind of Love, the Love that only a Mother has, is indescribable. And like no other, in this wide, brimming world of ours. But not necessarily one that I haven’t found a way to express. With words. And recipes. Especially, in recipes.

So to honor the birth of my beautiful Daughter, two years ago, on March 8th at 10:36am, I present to you a frosting that I’ve been working on for over an entire year. This frosting that embodies so much of the beauty, sweetness and uniqueness of my mischievous two year old. My Baby Girl’s Favorite Strawberry Frosting! Who’s ready for some Love??

1 cup unsalted butter, softened at room temperature

3 cups powdered sugar, sifted

1/4 cup pureed fresh strawberries, washed, cored & diced before being pureed

2 to 3 tablespoons heavy whipping cream

On a stand mixer, on medium speed, whip up the softened butter for a few minutes until smooth and shiny.

Dropping the mixer speed down to a lower setting, slowly add in the powdered sugar, one cup at a time, until fully blended.

With the mixer still blending, add in the 1/4 cup of freshly pureed strawberries, mixing until just incorporated.

Add in up to 3 tablespoons of heavy whipping cream, depending on how thin or thick you like the texture of your frosting and beat on high speed for a few minutes, until whipped and nearly doubled in size.

And FROST. On cookies or cupcakes. Or pop in a cup or so of this yummy treat into the fridge (covered) for 15 or so minutes until cooled enough to use as a fruit dip. Yes, I DID just say that you can use this lovely, sweet frosting as a fruit dip! Because strawberries, my friends! Strawberries!

From my Heart to your kitchen & the many tummies of those you love, enjoy!