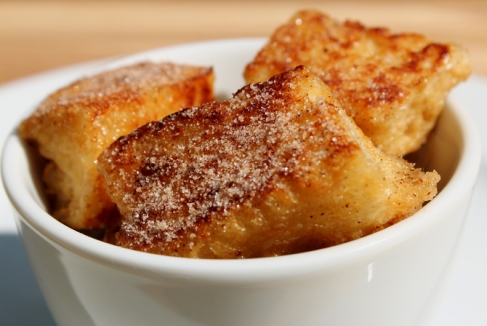
Happiness Project Recipe #17: Cinnamon French Toast Niblets!

Image

Oh breakfast! Bacon, eggs, hashed browns, pancakes, waffles and yes, we must not forget the most popular household staple: french toast! Since becoming pregnant 10 & a 1/2 weeks ago, this wiggling, waving little one has demanded so much from me, it’s actually quite astounding. Never before have I felt such a GROWLING need for comfort foods at such random hours of the day (and night)! Particularly in regards to breakfast foods! Up until now, breakfast was just NOT my thing. Give me dessert (any dessert!) & I was good. But since I’m now eating with another one’s appetite in mind, I will desist my snobbish disregard for breakfast foods & go with the cravings, AKA: Baby says, Momma does. Today’s craving? French Toast, which I’ve never had the pleasure of creating before. So French Toast bite-size niblets it is! Hungry? Here’s what you’ll need…

3 tablespoons granulated sugar

1 teaspoon ground cinnamon

2 large eggs

1/2 cup low fat buttermilk

1/2 cup whole milk

1 teaspoon vanilla extract

pinch of salt

1 loaf french or sourdough bread, cut into 1-inch cubes

2 tablespoons unsalted butter

Your favorite syrup

First, break out your cutting board & a large serrated knife to chop up your bread loaf of choice.

Next, in a medium size bowl, stir together the granulated sugar and cinnamon. Set aside.

In a 2nd bowl, whisk together the eggs, buttermilk, milk, vanilla and salt until nicely blended. Place the bread cubes in the egg mixture and using a large spoon, toss gently until the cubes are thoroughly coated and the egg mixture has been completely absorbed.

In a large non-stick frying pan over medium heat, melt one tablespoon of the butter. Drop half of the coated bread cubes into the pan and cook, turning often, until golden brown on each side, for about 8-10 minutes. When your 1st batch of bread cubes is nicely cooked up to your desired preference, move them to a dry bowl or plate on the side and repeat with the remaining bread cubes and 1 tablespoon of butter.  Once all of your cubes are cooked, sprinkle on the cinnamon sugar, using as little or as much as you like. Now, serve, with your favorite syrup and/or a little spoonful of powdered sugar and nibble, nibble away!

Happy breakfasting, my friends!
Happiness Project Recipe #16.5: Peanut Butter Chocolate Chip Granola Bars!

Image

Have you ever walked through a grocery store & come face to face with a certain food item that put your knickers in a twist? A few nights ago, after unsuccessfully attempting to fend off a ruthless craving for granola bars, I was faced with a rather odd food dilemma. I could have very easily just cheated by buying a package of pre-made granola bars but nooooooo, the invisible pastry chef sitting so snugly next to my ear (much like the devil on one shoulder & the angel on the other) refused to let me succumb to such unusual laziness. “Why buy when you can make your own?” she asked. So with a tiny bit of grumbling, I did. Hence this now perfect opportunity to share my favorite granola bar recipe with you!

½ cup creamy peanut butter

1/3 cup honey

1 egg

2 tablespoons canola oil

1 teaspoon vanilla extract

3-1/2 cup old-fashioned oats

½ cup brown sugar

¾ teaspoon kosher salt

1/3 cup peanut butter chips

1/3 cup semisweet chocolate chips

In a large bowl (either in a stand mixer or by a hand held mixer), beat the peanut butter, honey, egg, oil and vanilla until blended. In another mixing bowl, combine the oats, brown sugar & salt and mix together with a spoon (or by hand, if you want to add a little extra fun to your day). Now pour the dry mixture into the wet (peanut butter) mixture and mix well. Make sure your entire batch is nicely, evenly coated. Gently stir in your peanut butter chips & chocolate chips. Your batter will now be very, very sticky (and will smell quite divine!).

Transfer to a 9×13 inch baking dish coated with cooking spray. Since the batter is quite sticky, with your fingers, gently & tightly press the mixture into the edges of the pan until evenly spread throughout. Bake at 350F for 20 minutes until the edges are lightly browned. Remove from the oven & let cool on a wire rack for about 30 to 45 minutes to let the granola harden properly. Once the granola is cooled & set, take a serrated knife & gently cut up into however many bars you would would like (I like to cut up longer bars so I usually end up with around 12). I also tend to like a crisper granola bar versus a chewier one, so after initially cutting up each bar, I drop my oven temperature down to 300F, spread out my 12 bars onto a second sprayed cookie sheet & pop them back into the oven for another 5 minutes. So whether you want to go crispier or chewier, it’s all a matter of preference. You’ll be happy with the end result, either way.

Fun, right? Now every time you too come across your own grocery store dilemma, you won’t be haunted in the least by that ruthlessly nagging little pastry chef on your shoulder. Granola bars from scratch? Why yes! Yes, indeed!