Happiness Project #32: Chocolate Orange Pound Cake!

Image

Mmmmmm! Orange and chocolate. Since nearly every HP dessert I’ve done since first creating this blog nearly 2 years ago has mostly involved chocolate, I thought it was high time to throw some citrus into the mix. And since I’ve never experimented with oranges before (for shame, right?), I ended up whipping up a very traditional Chocolate Orange Pound Cake recipe. Traditional because I did absolutely nothing to change the actual recipe, though I might add some chocolate chips into the mix the next around. And WOW, was this one of this easiest yet quickest cakes I’ve ever done! One, which not only smelled DIVINE while puffing up in my oven but tasted even better the second day out! Need to whip up something yummy that everyone will like but don’t have much time to do so? Then this, my friends, is the perfect cake for you!

1 cup salted butter, softened at room temperature

1 cup granulated sugar

4 eggs

1 cup all-purpose flour

2 tablespoons whole milk

3 tablespoons unsweetened cocoa powder

The zest from 1 large orange

1/2 cup semi-sweet chocolate chips, melted (for drizzle)

Preheat your oven to 350F. Butter and lightly flour 1 small loaf pan. Or butter up a muffin pan for yummy, breakfast treats instead! Have kids, anyone?

In a bowl on your stand mixer, cream together the butter and granulated sugar until smooth and creamy. Add in the eggs, one at a time, until well mixed, followed by slowly sifting in the all-purpose flour.

Once blended, divide the mixture equally between two small bowls. In one bowl, add in the milk & cocoa powder and combine together. In the second bowl, beat in the orange zest until well mixed.

Spoon the mixture into the loaf pan, taking large alternate spoonfuls from each bowl. Using a fork, gently swirl the mixture together to create a marbled effect. Do not STIR the two batters together though or they will blend and you will lose the marbled effect.

Bake for up to 45 minutes until golden brown on the edges and top. With a toothpick, check to make sure that the cake is fully baked through in the center.

Let cool on a wire rack for a good 30 minutes before loosening the cakes edges with the flat side of a butter knife and removing from the pan.

To add the chocolate drizzle, heat up the 1/2 cup of chocolate chips in the microwave (20-30 seconds) until melted and smooth. Drizzle as much as preferred onto the top half of the cake. Or instead of drizzling melted chocolate, how about sifting powdered sugar on top, particularly if you (or you kids) are hankering for some breakfast muffins? Your kids will love you even more (because what child doesn’t love powdered sugar?) and most assuredly, ask for seconds =)

*Original recipe: BBC Chocolate Orange Loaf

Happiness Project #31: Merry Christmas Red Velvet Whoopie Pies!

Image

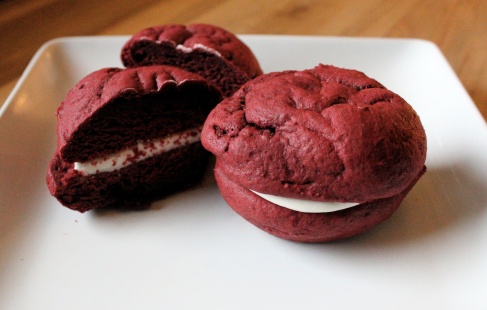
This year, or to be more accurate, last year, my twin sister REALLY wanted something Red Velvet for Christmas Eve, so the baker in me was undeniably all too obsessively happy to oblige! Enter the elusive Whoopie Pie. Firstly, what a rather festive, albeit somewhat silly, dessert name! Who comes up with this stuff, anyway?! Secondly, red velvet. Most of my family and close friends already know that I’ve never been a big fan of red velvet (desserts). If you’re going to give me chocolate then please just give me CHOCOLATE not COLORED chocolate. Chocolate is chocolate, right? Oh, SO wrong. Until I recently discovered a tub full of scrumptious red velvet cookies at Costco, nothing that I’ve tried has been impressive enough to replicate. But since making my family happy, makes me happy in turn, I went on a fairly exhaustive hunt for the best of red velvet dessert recipes. And was very pleased by what I found. At first, I thought about tinkering around with a red velvet cheesecake idea, yet as the hours until Christmas Eve started ticking down, I unexpectedly changed my mind. Since I still know a (surprising) number of friends & family who have never had the pleasure of tasting a Whoopie Pie before (some who have never even heard of the name), I knew it was the perfect opportunity to dapple around with one. With a twist. Why use something as simple as red food dye to color my cocoa when I could infuse it with actual red velvet flavoring instead? Which, to me, took these whoopie pies to the next level. Of yumminess. Don’t believe me? Try experimenting with both and you be the judge!

For the Pies:

2 cups all-purpose flour

3 tablespoons unsweetened cocoa powder

1 teaspoon baking soda

1 cup buttermilk, well shaken

1 teaspoon vanilla

1/2 cup salted butter, softened to room temperature

1 cup brown sugar

1 egg

1-1/2 tablespoons red velvet flavoring (or 2 tablespoons red food coloring) *I prefer using red velvet flavoring versus red food coloring because of how much richer the taste becomes with it)

Preheat your oven to 350F. Line 2 baking sheets with Silpat baking mats or parchment paper. You’ll need three separate bowls for this recipe, so add those to your placement of necessary kitchen tools. In bowl #1, whisk together the cocoa & baking soda. Set aside. In bowl #2, stir in the buttermilk, vanilla and red velvet flavoring until well mixed.  Set aside.

On a stand mixer, beat together the butter and brown sugar, at medium speed, until light & fluffy. Add in the egg until fully combined. After dropping your mixer speed to a lower setting, add in the flour, followed by the buttermilk mixture, in 3 separate batches. Always starting with and ending with the flour. Scrape down the sides of the bowl between each addition to create a smoother texture. Mix until just smooth (but do not over mix).

Now the fun and very pretty part! Using either a large cookie scoop or large spoon, drop up to 6 scoops of pie dough onto each lined cookie sheets. This will make you roughly 12 pie sides, equaling 6 fully assembled whoopie pies! Can I get a “Yum!”

Bake for 11-13 minutes. Whoopie Pies are meant to be a large, puffy type of “cookie” so don’t worry if you think that they are a bit soft once out of the oven. Cool throughly on a wire rack.

While your “cookie” pies are cooling, here’s what you’ll need for the cream cheese filling:

1 (8oz) package of cream cheese

1/2 cup unsalted butter, warmed to room temperature

1 teaspoon vanilla extract

2-3 cups powdered sugar

2 tablespoons heavy whipping cream

In a bowl on your stand mixture, add in the cream cheese, butter, vanilla extract and powdered sugar, mixing at low to medium speed until well combined and smooth. Mix in the heavy whipping cream and whip at high speed for 2-3 minutes.

Using a large spoon or large round decorating tip with a piping bag, spread a large dollop of filling onto one side of 6 of your whoopie pies. Press each 12 halves together and there you have it! 12 lovely, decadent Christmas Whoopie Pies! Your family or friends will adore these (and you for making them)!

Happy New Year and Happy Baking, my friends!